There are so many benefits to euro-nymphing. While the draw was obvious to me as I first witnessed a successful euro angler firsthand (Gilbert Rowley), it has been a steep learning curve. Many of the rivers I regularly fish are larger, with deep water and fast currents. It was daunting taking a short-game approach when confronted with so much water, but all the failed attempts have slowly payed off in the form of lessons learned. Success has come, but slowly.
Before picking up a whippy flippy euro stick, I was mostly drawn to fishing larger mouse patterns and streamers with an 8wt rod. While many fish can be caught with smaller nymphs, larger fish are caught with more regularity on larger fly patterns. True, smaller nymphs can catch larger fish, but I'm more inclined to think that this is the result of a numbers game. Fish are just more likely to put in extra energy to chase something down with a bigger energy payoff. They'll usually let the small stuff come to them.
Most bigger fish didn't get that way by eating zillions of tiny bugs. Don't get me wrong. This doesn't mean that a whole chicken and rabbit have to be tied onto five gaping B10S hooks to draw the attention of a big fish. I've caught some of my biggest fish on nothing bigger than a Wooly Bugger. It doesn't have to be a large streamer to do the trick.
While I still throw larger streamers on my euro setup on occasion, I have found more success in more situations with smaller streamers. I've toyed around with Dolly Llama streamers, Slumpbusters, and even my own Skullcracker Streamer. All are excellent patterns, but can be a bit unwieldy to throw on a lighter rod, once enough weight is added to get it down. All the rabbit leather and hair keep these patterns from sinking as fast, and as a result need more weight to compensate.
I have tied lead jig streamers for quite some time now, but a buddy of mine, Tim Davidson, came up with a simple way to paint the jig heads using just nail polish and clear Gorilla Glue, and put me on to using squirrel strips to minimize current drag for fishing them on a euro setup. It's been pretty downhill from there.
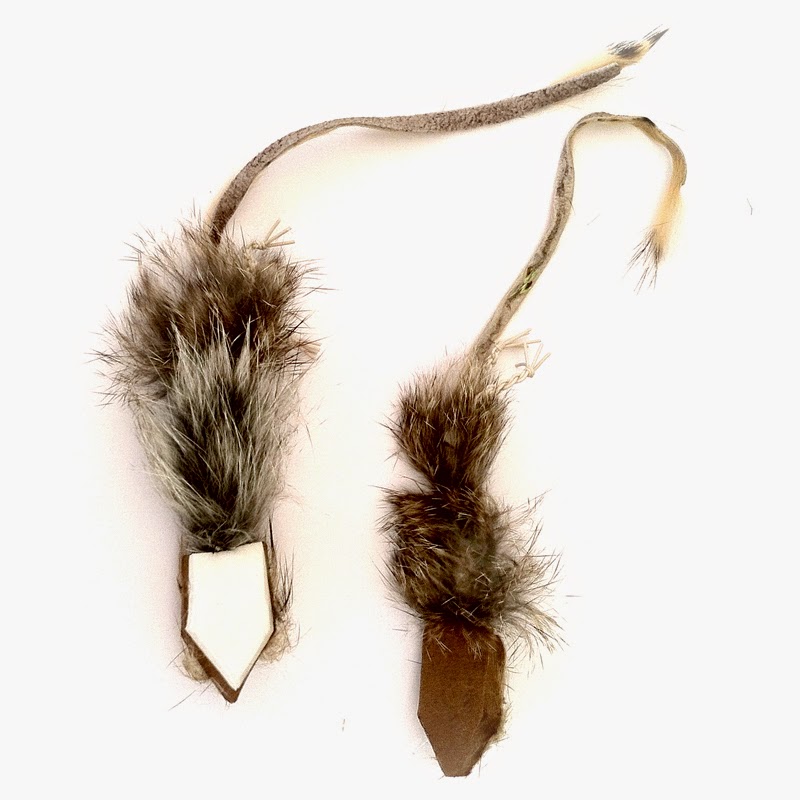
The following tying tutorials show two of the main few patterns I use with my euro setup. The Squirrel Leech is essentially the same pattern Tim ties, but the Squirrel Sculpin is a variation of a pattern tied by Justin Aldrich.
Two of my favorite things in a fly, simple to tie, and extremely effective. If you're not into the euro thing, these also fish well under an indicator. Tie some up and give them a whirl.
Squirrel Sculpin Hook: Wapsi Super Jig Head (1/32oz, 1/16oz or 1/8oz) Jig Coating: Your choice of nail polish color (Olive --> Sally Hansen 838 Ever Green) (White --> Sally Hansen 300 White On) + Clear Gorilla Glue Body: Dubbing of your choice to match/compliment your squirrel color (I recommend cream colored, or a tan/white ice dub) Tail and Collar: Squirrel Zonker Strip (color of your choosing, but Sculpin Olive is used in this video)
If you don't care for explanations, you may want to skip to 3:25 on this one. Squirrel Leech Hook: Wapsi Super Jig Head (1/32oz, 1/16oz or 1/8oz) Jig Coating: Your choice of nail polish color (Black --> Sally Hansen 880 Black Heart) + Clear Gorilla Glue Body: Dubbing of your choice to match/compliment your squirrel color Tail and Collar: Squirrel Zonker Strip (color of your choosing)
Can one think too much about mousing for trout? Maybe. If it is possible, I'd be more than guilty. As I spend most of my time mousing nocturnally, and the visual aspects are not the same as daytime, it has made understanding night-time trout behavior a slow process. To add to the difficulty, trout in different locations and different times of year behave differently enough that on more than one occasion I have been forced to question the meaning of life... or just my current tactic. I kid, but seriously, what else does one do when casting and retrieving in the solitude of the stars. And, just when I think I am starting to figure things out, some new idea or view comes to my attention. It's quite the process, but I love it.
Along this journey of piscatorial exploration fly patterns are like way-points. People who prefer to tie and fish their own patterns rarely stick with a particular pattern indefinitely. This may even be the case when a fly has proven effective. As new patterns emerge, those left behind serve as tangible glimpses into their designer's past. Many fail to see it, but both the tyer, and often their close friends recognize the memories held in one little fly. I see some of my own history through those little creations. It's a history of learning, and I often find myself wanting to tell people that "I used to tie it that way, but now I do it this way." When that urge arises, I often want to include accompanying explanations as to whys.
Well, here I am again, doing just that.
This post --> Mousing: The hookup problem is a precursor to this post, and pattern. It presents some of the problems faced when mousing at night, many of which I try to address with this pattern.
Fly Tying: The Ichabod Artimouse
Fortunately, the Ichabod Artimouse is a relatively simple pattern to tie. Unfortunately, that does not make it a fast fly to tie. The following is a list of what you will need to tie one up. Ingredients: Hooks
-Size 2/0, Gamakatsu Fine Wire Worm Hook
-Size 4, Gamakatsu B10S Stinger Hook
-Size 1/0 Matzuo Baitholder Offset Straight Eye Hook (you could use a wire shank here) Head
-Foam head (old/cheap flip flop, large double barrel popper head, foam shop mat, or layered foam)
-Tube fly tubing (clear pen tube with a pipe cleaner, or any other sturdy fly tube)
-2 or 3mm foam sheet
-UV Glue Body
-Yarn Bee Gilt Eyelash Yarn (I use black when using this material) OR -Rabbit Strip, like the original Artimouse (whichever color you prefer)
-Ice Dubbing (again, I use black for my night pattern, but you could definitely mix it up. A bright color may even somewhat resemble the classic Hemorrhoidal Mouse if put in the right area) Legs
-Medium Round Rubber Legs (I prefer medium because when furled, the knots usually hold. The larger doesn't without a speck of super glue) (whichever color you prefer) Tail
-Rabbit Strip (for this pattern, I used black, but you can mix it up)
The two following videos are both tutorials for the mouse pattern, but the first is a very succinct version, for those who just want that. The second is longer, and has much more commentary on the different parts. After the videos, I have included the reasons why I came up with the pattern in the first place.
When I first shared the Artimouse, it was fascinating to behold the changes that occurred in the world of mousing for trout. I've noted many people and patterns influenced, many of which I'm sure have no clue. That's just the nature of the internet. Now I see angled, large foam floating heads, and furled legs on mouse patterns all over. It's cool to see such a ripple effect and I definitely love seeing the resulting beautiful fish from people using the pattern. People all over have since added their tweaks and personalized parts, which has also been fun to witness. But, I digress, so, back to the main idea. If the original Artimouse works, why change anything? I'm so glad you asked. The following video addresses the topic.
This post is a precursor to my new artimouse pattern. It has been affectionately dubbed the "Ichabod Artimouse". Its creation was to try and deal with some of these issues. Now, let's get nerdy.
Hookups and mousing sometimes feel like antonyms. It's as if they are the same poles of two magnets that we try to force together. For anyone who has dedicated time to mousing at night, they can attest to the low hookup to blowup ratio. This is not based on any scientific studies, but my experience leads me to say that in general only about 20-30% of mouse-takes at night result in a hookup. This number varies some according to location, retrieval direction and type, timing and speed of the set, size of fish, and the fly being used. I have had magical nights where everything fell into place and my hookup to miss ratio was much greater, but as a rule, I hook far less fish than I hear or see splash at my fly. But, why?
It is an issue that has been swimming around in the cerebral juices of my mind for the past few years. It does not help that the questions only multiply with added contemplation. Is it just part of mousing, and as such, is an un-fixable problem that mousers must live with? How often are real mice missed in the wild? Is it all about retrieve and set style, or can fly design alter the outcome? Where to begin?
Problem #1 - Messy Takes
First and foremost, a mouse swimming in the water is a potential thanksgiving meal for an ambitious trout. The protein payoff is great, but the effort required to engulf and swallow such a large offering hardly matches the effort it takes to sip a small caddis. The angle of the take is a bit more vertical than a regular rise, as is evident by the toilet bowl flush/splash sound one hears in the darkness of night. It is usually violent. A fish that has committed to eating a poor amphibious mouse is out to kill, to drown, and often to eat. It's not pretty, and it's not clean cut. I think the fish that we hook are those who opt to eat their quarry whole and living, without the fear of being prey themselves. I guess we could call them raptor browns (think Jurassic Park raptors). With this carnal energy, combined with the angle of attack, it is not always easy for a trout to connect with the target. Items floating amid the waters surface tension act/react differently from items that are fully submerged. One moves out of the way easier than the other. It's worth thinking about. We can actually witness this whole messy take phenomenon in the following clip:
The fly is pushed out of the way, whereas if the same fly were subsurface it would be less likely to be pushed out of the way. I think this air-ball effect is often what is happening in the darkness of night, where both human and fish cannot see as well. We just aren't able to witness the fumbles visually. This brings up more questions. Does a smaller fly produce more hookups, or does a larger pattern?
Problem #2 - The Drowning Tail
This issue may well have been placed with the previous, but recent discovery of this video illustrated it so well that I thought I should give it separate attention. Often browns, especially those in slower waters, will try to drown the fly before consuming it. Often the tail is used as the tool. This also results in a very loud splashy noise, and if you are fishing in the dark of night, it's hard to tell the difference between a mouth-take and a tail-slap. So, naturally, we set on these tail-takes. We often feel the fish, but set only to find absolutely no resulting pressure. Because of this behavior, it can be very effective to cast the fly right back to where you felt the set, and let it linger there for a moment, occasionally adding very minute tremulous movements. The attacker may simply be hunting around in the darkness to find it's drowned victim. The following is a video that demonstrates this behavior exceptionally well.
Problem #3 - Big Fly, Little Fly
Flies, both big and little miss fish. Each has their strengths and weaknesses. To be honest, I'm still not decided on the matter. Small flies can certainly fit into a gaping brown trout kype with greater ease, and may leave hooks more exposed with the lesser amount of material used, but the target is harder to see (especially at night) and draws less attention in disturbed water. Smaller patterns can also be easier and less tiring to cast, but are also easier to push aside during an up-swelling take.
Larger patterns are easier to see in the dark, push more water, and can draw more attention. If they are articulated, their attraction factor increases with the extra jointed movement. This can add to the appeal and realism of the offering. In some circumstances I have done better with smaller patterns, but in my experience, this has only been evident when it is smaller fish doing the taking. Larger flies that hold more water are less easily pushed out of the way, but the fish has to hit it at the right angle, as there is more to fit into the mouth. They can also be more difficult to cast with the greater wind resistance. I always start out with an artimouse type fly simply because it is my confidence pattern, and has proven itself again and again.
Problem #4 - Hook Placement and Type
With a larger pattern, where it presents an option, it seems that fish either go straight for the head, or nip the butt, or sometimes the tail of the fly. If the fly is presented right, in relation to how a fish is oriented in the current, the fish T-bones the fly (the best scenario for hookup in my opinion). Because fish generally go for the head or butt of the fly, hook placement can be the difference between a fishless night or one spent tussling with trout. If the hook is too far back (at the end of the tail), you can snag the fish, if it is too far forward, it doesn't usually stick. I'm not opposed to placing a hook at the end of the tail, but I rarely choose to do so. This is not for lack of experiementing and trying. If it has worked for you, cool beans, keep it up. Another issue with stinger hook placement is distance between the two hooks. Place them too close together, and it can cut your hook penetration power in half (much like a bed of nails distributes and lessens the pressure of any individual nail). I have found great success with only using the stinger hook (I prefer mine just after the butt of the fly). I think clipping off the front hook can not only maintain the available pressure/force, but also allow more momentum to build before the hook makes contact, which can result in greater penetration. Gotta love physics.
One issue that a friend of mine brought to my attention, in regards to stinger hooks was the way they behaved due to their design. With a stinger hook, if it has a short shank, the hook can easily turn away from the thing you are trying to stick it into. The eye of the hook, being closer to the bend of the hook, allows more movement away from the intended target. Also, the angle of the eye sets the hook point further out of the way. For this reason, I now place some tubing on my regular octopus stingers to keep the hook exposed and in the line of duty. Or, I simply use a longer shank-ed, straight-eyed hook. Because these are difficult concepts to explain and visualize, I created the following video:
One more thing that can reduce hookups has to do with the size of the hook itself. People often tie mouse flies on larger diameter wire hooks. The finer the wire of hook, the easier the penetration. I think misses and lost fish can occasionally be attributed to this factor. I prefer my hooks super sharp and my wire fine.
Problem #5 - Fly Mass
No matter what kind, or how much material you put into a mouse fly, it will not match the mass of the real deal. A real flesh and blood mouse has a greater mass, and therefore, is not moved or pushed away from the trouts mouth as easily as an imitation. I suppose we could make a pattern that weighed as much, but no one would want to cast it. Maybe I would on a spinning rod, but on a fly rod the thought isn't at all appealing. This is one area it is difficult to address with a fly. I often wonder how much it affects the outcome. Larger flies or materials that retain water may be less susceptible to this problem.
Problem #6 - Big Fly Heads
Fish commonly go for the head of a fly. Sometimes having a large foam, cork, or deer hair head can prevent the hookup. The fish often get the fly in their mouths, tension is felt, the angler sets, and then the fly comes flying back at the angler, without the fish in tow. Here is what I think is happening. Once the tension is felt and the angler sets, the big head forces the fishes mouth open. The jaw pops open because there is so much force placed on the fly and the fish doesn't have time to clamp back down on the hooks, which follow right behind the fly's head. I think this is one reason some anglers prefer the smaller flies. A smaller pattern usually has a small enough profiled head so as to not impede the hookset. With the bigger patterns, I think this downfall can be, at least partly, overcome by proper timing on a set.
Another problem with large foam heads is the water resistance they have. It's like attaching a large thingamabobber an inch or so from your hook. There's bound to be issues with the hookup and fight. I see three obvious problems it presents.
Firstly, when a fish takes the fly, the angler has to set hard enough to force the hook into the fishes lip. The force necessary is magnified considering the angler is pulling a chunk of foam through the water as well. The big head's ability to push water makes the mouse pretty irresistible to fish, but it adds a degree of difficulty in setting the hook. Two edged sword I suppose.
Secondly, water resistance and a large foam head also, in some cases, I think, cause the hook to work out once the fish is hooked. When a fish is thrashing around under water, the head has buoyancy force pushing it upward, making it want to float, as well as the force pushing it in the back and forth water resistance. It's no wonder it can pop out during the fight.
Third, and lastly, some sensitivity is lost. When a fish comes up and takes the fly from anywhere but the head, the fish must pull against the floating head for the angler to even feel something. Not all mouse takes at night are loud and splashy, in fact, I think the bigger the fish the less splashy and noisy a take is. If a big fish "sips" in your fly by the butt end, you aren't likely to even notice, and by the time you move to set, the fish has already let go.
These are some of the primary issues I have tried to address with my most recent mouse pattern, the Ichabod Artimouse (Ichabod Arti for short). Its tying tutorial will be put up shortly after this post.
Problem #7 - Setting Struggles (Timing)
On multiple occasions, I have found myself mousing right alongside a friend. One is hooking fish and the other is struggling to connect. Both fishing the same fly. Both fishing the same water. Both getting takes. Only one connecting. The difference? At least in part, it is the timing of the set. I once heard that in New Zealand, guides encourage their clients to say "God save the queen" before setting on their dryfly takes. This is to allow the fish to turn away, causing the line and in turn the hook to press against the fishes lip, so as to increase the chance of connecting with the hook. I have tried applying the technique to my mousing, and it makes all the difference. I used to be a big proponent for only setting once you feel tension. I have since changed my opinion of the matter. I now treat my mousing takes like a big fish dry fly take. Listen to the take, wait a moment for the fish to turn, then strip set hard (I often also add a rod set to this action). On one trip this year with a friend, who was in the exact same scenario I mentioned a moment ago, he finally got the extra pause down, and proceeded to hook up and land fish the rest of the night.
I think sometimes anglers think a fly does not work because they are struggling to hook a fish. They sometimes switch to a different mouse pattern and start having more success. There is nothing wrong with this, but I think the change in fly is more successful because it better matches that individual's technique rather than the fly itself being any more or less effective. Cast, retrieve, and even setting are all affected by the patterns we choose to fish. Go with your confidence fly, but remember there is always more to learn with other patterns, which leads me to the last problem.
Problem #8 - Impatience
Sometimes all we want to do is catch fish. I often find myself gravitating toward the places I have already known success. But, I also know the gratification of fishless nights of discovery and learning. Sometimes I want one, and sometimes I crave the other. Success is always sweeter with the latter. It is earned, and I always come away wiser and with more ideas. People don't have to enjoy the same things, or approach them the same as myself. I'm grateful that most do not, despite my liberal giving of information. For those who are interested in having more success with mousing, to you I say, do not give up. Limit yourself to only fishing one mouse pattern for the whole night. Try it for a whole day even. And don't give up on a specific location. Try it from different angles, different water levels/time of year, and with different retrieves. I have fished the same waters that others have pounded to death, only to find success from approaching it differently. If you keep getting blowups, but aren't getting it to connect, try slowing your retrieve down, waiting longer after the take, or set even when you don't feel tension. Success will always be hidden from the impatient, both in mousing and in life.
Final Thoughts
No matter what an angler does or fishes differently, I still think there will be plenty of missed fish, especially when chucking a mouse at night. Much of the missing, I think, is the nature of the beast. We anglers miss plenty of fish even in broad daylight. But, just like during the day, we can make adjustments to our technique and our gear to increase our odds. Once an angler gets these things in line, I'd dare say the hookup rate improves to around 80%, and 80% is a pretty epic night of mousing.
It is silly sometimes the things we put off. Usually it is the simplest of things too. I'll chalk it up to human nature. Either way, multiple recent requests to either tie or give instructions for the this fly have motivated me to finally film a tutorial. I apologize for it's length. It really is a simply fly to tie, but you never know how long it takes to explain a simple pattern, and your reasoning behind it, until you try. The simplicity of this pattern makes it easily customizable, so don't feel the need to do it exactly how it is shown. Good luck if you give it a whirl, and I hope it helps you do some damage.
Fly Tying the Night Rider Streamer
I looooove brown trout. In any given day they are generally my favorite fish to chase. I love their primal predatory instincts, aside from their buttery mother-lovin' exterior. Hunting a hunter is a bit of a thrill. Careful, I'm not saying you should go chase someone in an orange vest during hunting season. That could end very badly.
Brown trout are all about the ambush. They prefer the nocturnal darkness of night to chase down unsuspecting minnows, leeches, and even rodents. Because of their hunting prowess, they are often found in the same areas as their quarry at night. This means big brown trout waddle up into those shallow areas we walk right through to get to the deeper lies during the day. Fishing these shallow areas can be tricky with a heavier fly at night. Also, fish are notorious for short-striking in the darkness. Swatting at silhouettes is tricky business. For these reasons, I developed this pattern early on in my night fishing explorations, and it has remained an effective staple fly in my night fishing arsenal, even to this day.
The artificial material gives the fly buoyancy, the natural materials add a seductive movement, and the stinger hook helps seal the deal. Don't be fooled by it's simplicity. I am a firm believer, born of experience, that the simpler patterns are often the deadliest.
Ingredients:
-4x size 2 streamer hook
-Size 4 Gamakatsu Octopus hook
-65lb Braided Fishing Line (Spider Wire)
-Beadalon (optional)
-4mm plastic beads (in whatever color you want to tie - black and clear are my go-to colors)
-Marabou (whatever color you want to tie in - again black is my most common)
-Rabbit strip (you choose the color)
-Polar UV Chenille (or another similar chenille of whatever color you prefer)
-Rubber legs (usually black), or glow flashabou
-Other optional additions: Bead or cone head, dumbell eyes, deer hair head, fish eyes, etc.
I spent at least an hour on that dang thing. Two virginal casts, and it was gone. Another sacrifice to the gods of rip rap and underwater snags. Somewhere down in that dirty green hued abyss lay a beautiful fly. I had poured love, attention, and detail into that thing. Maybe I should start carrying a wet-suit and goggles, I thought to myself. Should I throw caution and comfort to the wind and make an exploratory dive to salvage that little work of art? The thought was a tempting prospect at the moment. It is painful to lose something created with such care and attention to detail, and only after the second cast. In a grumpy funk I tied on another pattern. This time it was one I could fish and lose without the same agony I had just experienced. Two times in a trip would be more than I could take. I made the switch, cut my loss, and slowly drifted into a focused state. Without the risk of lost artwork, I could dedicate my attention to the reason I was there; to fish.
I try not to think about how often this scenario has been revisited. It's a natural following for someone who loves to create and experiment with fly patterns. The flies that are most pleasing to the eye are often the hardest ones to lose.
Anglers are left with two options: 1- they can fish beautiful flies, enjoying the confidence they induce, but all the while stressing over the potential snag and loss, or 2- they can fish a basic bread-and-butter fly that took a fraction of the time to tie, is far less painful to lose, is cheaper to make/buy, and induces a different type of confidence born of consistent success. Each scenario has unique consequences.
What is a stupid fly?
Beautiful and complex flies can create a confidence that is remarkably valuable, but also often results in a distracted angler, who gingerly fishes the fly in a superficial manner, and only hits the sweet spot zones here and there. This confidence is a result of seeing something that resembles the real thing to the angler. It may not move or really look like the real thing at all to a fish, but out of the water it may resemble, at least with the help of our imaginations, what we're trying to mimic. For one of these more artistic, many-materialed patterns, fishing it slower, deeper, or tighter to cover is to risk losing that little labor of love.
Bread-and-butter, or what I like to call "stupid flies," can be fished with a reckless abandon. Sometimes they are ugly. Sometimes they don't actually have an apparent relevance to a living thing. These patterns are stupid because they are often extremely simple to tie, and are made of relatively inexpensive materials. They let the angler probe the deepest depths, toughest cover, and snaggiest riffles to get to those sweet spot zones rarely reached by the cautious fly guys. This is one reason the tried and true woolly bugger is so amazing. Simple, cheap, and easy to tie, and probably one of the most effective patterns out there. Usually boring, always effective.
Confidence is a crucial element of success in the world of fly fishing. We work a run differently when we have some degree of faith in the catching. A fly that has so much attention to detail that it truly resembles what it is trying to mimic, or at least gives us that impression, is phenomenal for inducing confidence, but the pain of losing one of these flies is considerable. If the resulting success is substantial, we usually endure the pain. Whether bought or tied, this can be hard on the pocket book.
To summarize, one confidence comes from an impressive looking fly, but another type of confidence comes from fishing a fly that just plain works, even in it's simplicity, and can be lost without much remorse. With this kind of confidence an angler fishes the deeper, slower, faster, and snaggier runs, and covers those sweet spot zones better and longer. Anglers who tend to fish the stupid flies are generally more effective. They fish without fear of loss, which is to say, they are far less distracted.
Stupid flies are for anglers who like catching. Fancy flies are for those who like to tie, or admire what has been tied on top of the attempted catching. So, if you like catching fish, I highly recommend identifying your stupid flies. If you're nymphing, these could include Pat's Rubber Legs, Glo-bugs, San Juan worms, or mohair leeches. If you are throwing dries, these could be Parachute Adams, Chubby Chernobyls, or Rusty Spinners. If you are throwing streamers, these could be Wooly Buggers, Circus Peanuts, Peanut Envys, or any other glorified, articulated woolly bugger-like streamer. For myself, I always have woolly buggers/leeches, Skullcrackers, and Skullchasers, in my box. These are all flies that are relatively easy and fast to tie, and don't break the bank. I can fish them with confidence, and without fear of losing a fly or two in the process.
It isn't stupid to like the nicer flies, to enjoy purchasing or tying them. Sometimes that is just one way to find more enjoyment in the sport. It really all depends on your goals, and what stage of angling you are in. In fly fishing, we all have different things we consider stupid. For some it could be a view that someone else's methods are unorthodox, or not really fly fishing. For another, fishing is stupid when there is no catching going on, or the catching is not easy. For me, it's probably because on the end of my line you will usually find a stupid fly. They work, and that's why I love them. Don't get me wrong, I enjoy the others, but you'll never find me without my stupid flies.
I am curious, what are some stupid flies you would add to my lists?
Deep roiling water is one of the toughest places for a fly fisherman to access. The combination of current and water depth keep a fly from getting deep enough, with enough time to actually get a presentation in the hole. Oftentimes we anglers cast to such places, and when we don't get a take, we assume there is no fish in that particular spot, when in reality we just weren't getting in the zone. In fact, I think many fly anglers poorly understand just how long their subsurface flies spend in the actual fishy zone. On average I would say that a cast maybe spends about 1/3 to 1/2 the time of the actual drift in the zone, and less when there is increased current or water depth. Anglers can compensate for this, when they understand the need, by casting further upstream or using more weight. Casting upstream can allow some access to this deeper roiling water, if there is a place to cast upstream, and if there is not a great likelihood of getting snagged in the water upstream of the hole you are trying to fish.
Adding weight can be a great way to get to the zone quicker, and stay there longer. The drawback with more weight is it can result in many more snags. With nymphing, getting good at setting indicator depth can help with this issue. With streamers, adding weight can be tricky because they are usually fished on a retrieve, rather than suspended. Tying more weight into streamers helps them stay in the zone, if you are using a floating line, but can cause anglers to fish a streamer faster than it should be fished, because there is a fear of snagging and those dang things aren't cheap to buy or tie! This problem made me want to find some way to keep my weight, but lessen my snags. Ultimately this pursuit has lead me to jigs.
My buddies and I always joke that if you want to catch good fish, you have to go where the rednecks go. It's a joke, but we are serious. On that note, it doesn't hurt to have some redneck in your blood either. When redneck meets fly fishing, some type of guerrilla warfare results. So dirty, and yet so effective. It's not pretty casts to sipping risers and it's certainly not using silk lines or light tippet. Those who choose to keep an elitist attitude with fly fishing are more than welcome to their opinion. Everyone has their "this is fly fishing and that isn't" line in the sand. In the meantime, I'll just be over here, in my redneck ways, enjoying catching fish. I guess you can't please everyone. In the end jigs and fly fishing are a unique marriage. They are deadly effective, different to cast, and are becoming quite popular both with nymphs and streamers. One of the unique characteristics about the Skullcracker streamer is that it is tied on a lead-headed jig.
Fly Tying: The Skullcracker Streamer
The Skullcracker streamer was designed specifically to fish deep, churning water - behind rocks in heavy rapids, below water falls, and fierce eddies. Since it's creation, I have come to use the pattern in many other circumstances as well, and have found it quite effective. I even nymph with the pattern, but usually with smaller renditions than is shown here. It has been a great weapon to add to the arsenal. I even think it would be killer for bullies in deep pools, but I haven't been able to try that theory out yet. The articulated version has a bull trout's name on it though.
I usually fish it in tandem with an unweighted Skullcracker (Skullchaser) about two feet behind. The duo is pretty killer, especially in the fall.
Ingredients:
Hook - Jig of your choice. I prefer 1/16 or 1/8oz for my streamer. Gamakatsu are the best, but pricey. Wapsi makes a "Super Jig Head" jig that is made with Mustad hooks, and they are my main staple because of the lesser price.
Paint - Lead jigs require a painted head for the most part. Protec Powder Paint is probably the toughest option, but applying it requires a heat source (heat gun) and some forceps. It still chips, but not as quickly as other options. Nail polish is probably the easiest way to paint a head, but it chips pretty quick. I have been meaning to try putting a coat of Softex over a painted head to see if it adds to the durability, but I have yet to pick up any Softex.
Body - Olive Barred Rabbit Strip (Or White, Black, Tan, etc depending on the pattern)
Underbelly Tail - Cream Marabou (Or Black, Brown, Tan, Orange, etc depending on the pattern)
Pectoral Fins - Olive/Green Pheasant Rump (I only use this with the sculpin pattern)
Collar - Red Brite Blend Dubbing
Optional Flash - Polar UV Chenille adds a very nice and subtle bit of flash to the fly. Simply tie it in at the same point where the rabbit is first tied down and wrap it forward alongside the rabbit strip. Holding them side by side as you wrap makes it easier and keeps from covering up one with the other.
Why make a new mouse pattern when there are some very effective and proven patterns already? Good question. Aside from my usual desire to tinker and urge to personalize my piscatorial pursuits, I began noticing a couple things as I studied in-water mouse behavior.
The Movement
Once a mouse falls or climbs into the water they do not stop swimming. The motion is pretty constant and yet it has a very erratic look. Here is a short video that shows the quick motion of the torso, which results in a "swimming tail" look. The tail wiggles back and forth as a result of the kicking legs.
The Legs
When mice swim, their hind legs serve as the motor. A mouse's hind legs are far more powerful than their front legs, and they rely heavily on them when in the water. The hind legs extend past the mouse's rear while swimming. One shoots out, then the other in rapid succession.
There are some excellent mouse patterns out there, a couple of which I think are prime for certain circumstances, but I'll get more into that in my night fishing/mousing tactics post later. Most patterns are either cut from rigid deer hair (no inherent movement), lack legs, are restricted to one hook, or lack the ability for the tail to "swim". As I did research, trying to make this the #yearofthemouse I came to realize with some tweaks I could develop a pattern that better fit my needs. Enter the ArtiMouse.
The ArtiMouse is so named because of the added articulation. I initially thought about calling it the Artimus (mus being Latin for mouse, and it made me think of Maximus from Gladiator), but thought the simpler title might be more accessible. It is a super simple tie with only a few ingredients. I think the key differences with the Arti-Mouse from the patterns considered to be staple mouse flies are the angle and buoyancy of the head, the added legs and way they are tied in, the little bit longer tail, and lastly the articulating torso.
How To Tie The ArtiMouse
UPDATE 8/23/14 : I have been working with a new stinger hook version and have decided that I like it much much more, though it is just a bit more involved to tie. I produced a second video to show the modification.
Head: Six 2mm foam sheets (or whatever the heck the thickness of that cheap craft foam is) layered and glued together with spray adhesive. Cut into 1"x3/4" pieces for individual heads. A round, pointed popper head of similar size would work as well, just as long as it was attached at a 30ish degree angle to the hook.
Body: Rabbit strip (whatever color you prefer and think matches your local field mice... brown, gray, white, tan, black, etc...)
Legs: Medium Round Rubber Legs - 4 strands furled together - (tan, pink, white, black, or brown)
Tail: Rabbit strip, or Chamois towel (gives much more movement, but can tangle around the hook a bit more). If you want it short, tie it short, but I prefer mine to be at least 4".
Optional Glow: A small glow in the dark corkie can be cut into halves and one half can be glued to the nose of the fly. I say the "nose" because of the angle the fly sits in the water. I suggest placing the fly in the water, attached to some line and pull the fly slowly so you see where it needs to rest. The idea is so the fish can't see it so well, but you can when retrieving it. If you place it on the top of the head it will disappear from your view when you retrieve it (learned that one the hard way). Glow in the dark flashabou can work as well.
The Head: I chose foam because of it's ease. No need for fly floatant and no drowning fly. Popper heads would have worked great I'm sure, but for the money and ease of access the craft foam sheets were a good choice. I have also heard of people using or buying cheap/old flip flops to make popper heads. (9/10/2017 Edit: For the past three years I have come to solely use cheap flip flops. They are cheap, require no gluing, and make the whole process much simpler.) Craft stores often have cheap pairs for 1$ each, something to consider. The reason for the angled attachment to the hook is that mice create a V-shaped wake from their pointy head sticking up out of the water. The angled foam head mimics this wake.
The Body: I prefer rabbit fur because of it's inherent motion. It requires very little movement to actually look like it is moving. Also, in water it flares out and creates a bulky profile. This is also an advantage when casting because it becomes narrow and slicked down when out of the water. The one drawback is that in very fast water it gets narrow also, but even then I have had success swinging the fly.
The Legs: Most patterns have legs in odd areas, or no legs at all. I placed the legs on the tail section, so they can "swim" with the torso and tail. They also add to the profile when dead drifting the pattern. In the initial tying video I mentioned that to furl them they are twisted in opposite directions. That was incorrect (oops, my bad, sorry). Both sets of two are twisted in the same direction. If you were having trouble trying to furl the legs, that may be why. (If you don't want to bother with furling, simply using a rubber band will work as well.)
The Tail: Rabbit strips with most of the hair trimmed off rarely wrap back on the fly itself and allow for a decent amount of movement. I tend to tie my tails a bit longer than most. I know that most mice have pretty short tails, but I feel the movement created by the added length adds to the fly's appeal. Strips of Chamois towel give a lot more movement, but can be more of a hassle because it can tangle back on the hook. (9/10/2017 Edit: I now tie my tails a bit shorter, usually about 3-4".)
Misc: When in the water mice swim like most animals, with their head out of the water for breathing and body mostly submerged. This is why I only wanted the head to float, to mimic that angled orientation in the water. It think it also gives a more realistic side-view of the fly.
I put together a short video to show how the Arti-Mouse looks in action in the water. It was a little tricky filming and casting at the same time, but I think it helps show at least a bit of the motion it has in the water. Wish I could say "fish included"... maybe next time.
The following are a couple pictures (borrowed for educational purposes) that help to see some of what I'm talking about.
So far this pattern has proven effective. It is the result of quite a bit of testing and a handful of prototypes. I may make some variations or changes eventually, but so far this has done the trick. Give it a try and let me know if you have any luck!
If you are interested in the pattern, but don't want to tie any up yourself, they can be purchased. Just send me an e-mail or a message on one of my other social media outlets for details. Thanks.
More details on how I fish it can be found in this post: "Mousing"
The Hotwire Hare's Ear has proven an extremely effective pattern. I nymph with it as well as use it to trail streamers. The fish love to take it slow stripped, on the swing, and dead drifted. I'm not sure if they think it is an emerger or tiny baitfish, but either way they seem to like it. The "hotwire" rib seems to makes it pop in murky conditions too. It's no great leap of innovation in the world of fly tying, but it seems to work. I always have some in my box now. It's a quick and simple tie, so have at it.
A tandem rig with two articulated streamers is not for everyone. It is risky business to say the least, and I have multiple experiences to prove it. I remember all too well the time I had this very pattern embedded in the back of my head. But the risk is worth it in my own humble opinion, because the tandem setup picks up fish consistently. It's like a well shorn mullet. Sometimes people go for the business up front, and sometimes they prefer the party in back. I like options, and so do the fish.
Usually the setup is to place a beefy streamer up front as the lead fly and then follow it up with a small black trailer. The go-to trailer fly used to be a simple wooly bugger, and it would often do the trick. But the more I fished that setup, the more I would get frustrated with lost fish. Often they would stick, but only for a moment. I started thinking about the advantages of articulated streamers and how the extra hook can play to the anglers favor. After a little tinkering, this pattern was born. It is stupid simple, and it could even be called a glorified wooly bugger. Either way, it works.
The Hotwire Sidekick Streamer
Ingredients:
Hook: Dai Riki #730, Size 8, 2xLong Shank
Cone Head: Dan Bailey, Gold, Small (tungsten is a great option if you are fishing this solo and want a deeper presentation)
Rabbit Strip: Black
Ultra Wire: Medium Chartreuse (hotwire)
Polar UV Chenille: Black
AZ Simi Seal Dubbing: Peacock
20lb Mono or Beadalon for articulation connection
There are actually two ways I like to tie this pattern. For a bit less flashy look here are the alternative materials. These replace the "Polar UV Chenille: Black"
Regular Chenille: Dark Olive/Black
Hackle Feather: Black Schlappen
(Simply tie in the Schlappen and the regular chenille on the step the Polar UV Chenille is tied in. Wrap the chenille forward first, then the Schlappen feather, and then counter-wrap forward with the hotwire.)
The Polar UV Chenille does not retain water and rides higher on the retrieve. It is great when fishing this pattern as a trailer, because it does not ride lower than your lead fly. I prefer the less flashy pattern when I use this fly by itself, unless I am fishing it at night. In the dark I also prefer the Polar UV Chenille pattern because of how high it rides. There is another pattern I call "Night Rider" that incorporates the Polar Chenille for that same reason and is used for night fishing. That tutorial is still in the works.
What's with the name? The length of the fly and the flowing movement it makes in the water reminded me of the flying dragon in The Neverending Story. Admittedly the dragon is a bit creepy, but sometimes names have a tendency to stick. This has been an excellent pattern. It was killer this past summer and fall. Almost all of the large browns I picked up this past fall came on this pattern. It is a variation of both the Provo River Hooker by Collin Carlson and the Circus Peanut by Kelly Galloup.I usually tie it in olive to mimic a large sculpin. It's 5-6 inches long when finished. I have had success with it in black but usually for night fishing. For that I make keep the tail really short (probably 1/4" beyond the tail-hook's bend. For the night pattern I also use little to no weight.
Eye
-Ibalz (Size depends on conditions/depth you will be fishing) The ones in the video are tied with 1/4"
Any other dumbell eye, or a sculpin helmet would work too.
Head
-Wool (Olive) or Barred Rabbit Strip (Olive) or a sculpin helmet.
Body
-Maribou (Olive, Cream, Brown or Black)
-Barred Rabbit Strip (Olive)
-Dubbing (Brite Blend Red)
-Sili Legs (Barred Olive/Green)
-Cactus Chenille (Olive)
-Polar UV Chenille (Olive)
-Beads (Glass or Troutbeads) Any dark color works. Glass balances the weight a bit better.
Pectoral Fins
-Pheasant Rump (Olive/Green)
Misc
-Mono or Beadalon for the articulation connection (I use 20lb P-line CXX mono) The How To:
"Whenever, therefore, people are deceived and form opinions wide of the
truth, it is clear that the error has slid into their minds through the
medium of certain resemblances to that truth."
-Socrates
Both fish and people alike are prone to chase after imitations. I wish I could say fish do so more than people, but that is probably not true. I wonder what fish would tell each other concerning such things if they could speak. Just imagine it. One fish says to his friend, "you mean you actually thought that hairy thing was a minnow!? What a doofus." Putting aside the theological discussion that could be had concerning people, I have to admit that I am grateful fish can be duped. What is even more gratifying is knowing that the device for deception can be a homegrown, do-it-yourself affair. "Matching the hatch" is the common phrase, but "matching the meat" could find its place as well.
There is something to tricking a fish into eating fur, feathers, thread, and steel. It appeals to the sleeping caveman hunter in all of us. Sitting at the vise, grabbing various materials, building a new fly as it is tied can be quite fun. Then fishing it, feeling how it casts, and observing its movements in the water. The biggest test of all... does it catch fish. After fishing the pattern and getting a feel for it, you take the ideas back to the vise and tweak a bit here and there. Does it need more weight, a bead here or there, perhaps less weight, a different color added or taken away, a shorter tail, or a multitude of other options. Then you repeat the process. It is much like the caveman hunter going through a transition from stick spears to stone arrowheads, and finding that sharp stones make for bigger game. The entire process is enjoyable and adds a whole other creative dimension to fishing.
Foolery Goodies.
It has been a fortunate fall thus far. The attempts at fish foolery have paid off greatly. This beautiful specimen took the Magic Dragon sculpin pattern. I was in shock at how girthy this guy was. It would take almost four hands to reach around him.
I am becoming more and more convinced that there are large fish in
most waters. The trick is figuring out location and feeding patterns.
Our night fishing escapades really brought this idea home. A run in an
easily accessible area, that is fished with heavy pressure day after day
can still put out massive fish. Shane proved that point once again
with THIS FISH from this past weekend. Big fish have to eat too, we fishermen just have to figure out the wheres and hows.
Big streamer. Big fish.
Chubby lips.
Blue spot.
This has to be the biggest whitie I have ever seen.
This one is for Gus. Recognize the fly?
The SF is already at lower flows than last years winter flows. Could get even lower. Should make for some accessible wader fishing.
This week we'll be up north chasing macks and some more browns with gaudy streamers. Let's see how the lakers take to our deceitful ways.