
Not long ago a friend of mine mentioned he had put together his own streamer fly box. The idea has been on my mind for quite some time, considering I carry most of my flies in jumbled little nonwaterproof containers. With my fly diet mainly consisting of streamers the past few months those little boxes just weren't cutting it. So when Josh showed me his creation it was enough motivation to finally put something together. And though it is not the exact same as the boat/streamer boxes you can buy in the fly shop, it is pretty darn close. The only real difference is the foam used, for which I am still trying to find a cheap source.
The best part of all... the whole project only cost $11.00 as compared to the 40 and 50 dollar boxes you buy elsewhere. I'm not knocking those boxes. I would own one in a heartbeat, but a poor family guy in college has to make what he has work. (If only you could see my cracked flylines!)
Materials Needed:
-Plastic Container: I originally purchased a 10$ clear box at a craft store (which, oddly enough, was the exact same container you see used for most baby boat fly boxes).
 |
| First container looked just like this, without the logo of course, and was clear. |


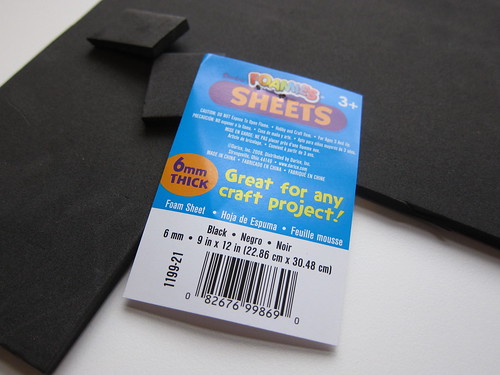
-6MM Craft Foam: Two 9x12 sheets. They cost a bit over $1.00 each and I chose white. If you have access to the more supple self healing foam you see in fly boxes, it would probably work better.
-Two Sided Tape: I already had this on hand, but it may cost you a couple extra bucks if you don't have any. You can also use glue (spray adhesive or super glue), but I wanted to make it easier to replace the foam at a later date.
-Tools: (scissors, razor blade, pencil/marker, ruler.)
The How To:
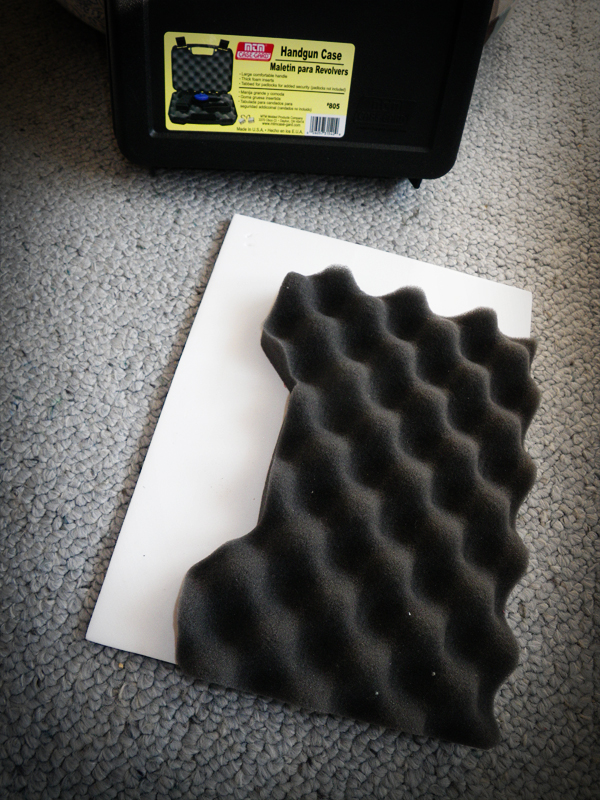
Start by removing the foam inserts (if you have a gun case). Take your 6MM foam sheet and draw an outline of the box so it can be cut to size.

One of the conveniences that comes with using a handgun case is that a foam outline is already provided.
After drawing a rough outline, make your first cut with a pair of scissors, or razor-blade if you prefer. Then place the foam piece into the box to ensure a proper fit. Trim any excess and refit if necessary.


Once you have a proper fit, you can use this piece as a template. Use it to draw and outline on your other sheet of foam and then trim it to fit the other side.
Because craft foam is not self-healing or as supple as the foam used in retail fly boxes, it is best to create slits in the foam to hold the flies. This prevents the foam from being torn up quickly and holds the flies quite well. Being a bit OCD, I used a pencil and ruler to map out where the slits would be.


Once you know where you want your lines, score the foam with the razor blade. Make sure you have something behind the foam that won't be damaged by the blade. You can cut deep, but not all the way through the foam, or you can slice it all the way through. I decided to cut mine clear through, however, if you do this you need to secure the foam together on the back (most tapes will do this). I used the two sided tape on the back of the foam and taped perpendicular to the cuts while holding the foam snugly together. If you prefer, cut shallow first, put a fly into it and see how you like it, then adjust accordingly.

Next, line the empty plastic container with two sided tape (or glue if you wish). I think the larger "packing-tape sized" two sided tape would work better, but we had a smaller roll on hand. If your plastic box has grooves of some kind, you can fill them in with something, but I didn't worry about it.

Once you have lined your case, insert your foam sheet and you are done! Stupidly simple, and the only difference from a retail box is the type of foam used!

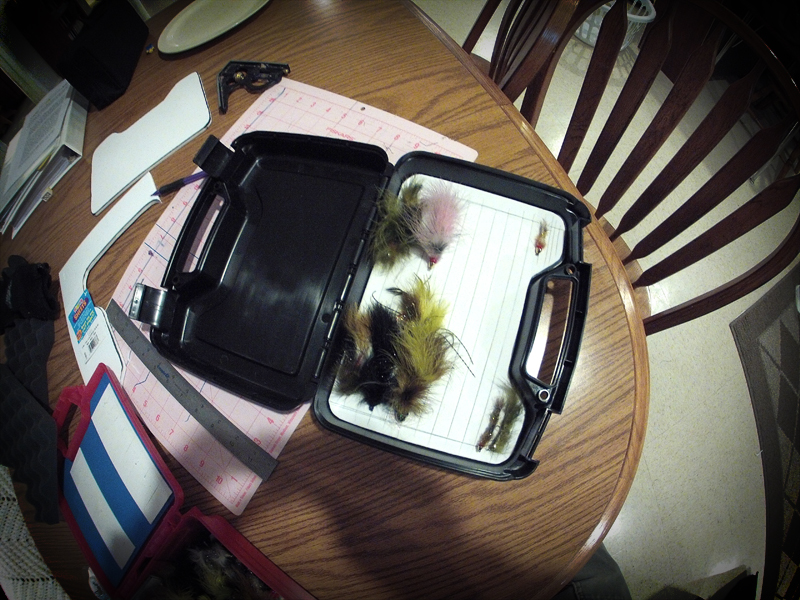
Here is the finished product full of goodies. Now all I need is to make another. I'm already running out of room!

If you have any suggestions, comments, or ideas of what can be tweaked or added please let me know.
Alternate Foam Option Here. Or Here.
If you found this helpful head on over to our Facebook Page and give it a "Like"! (You can also hit the "Like" button on the top of the sidebar.)