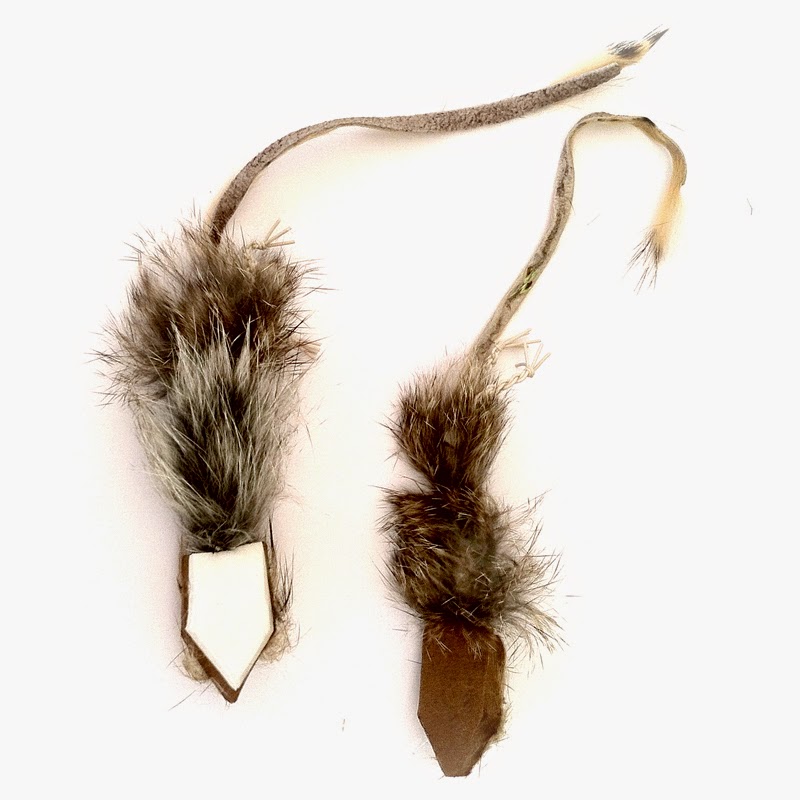
Can one think too much about mousing for trout? Maybe. If it is possible, I'd be more than guilty. As I spend most of my time mousing nocturnally, and the visual aspects are not the same as daytime, it has made understanding night-time trout behavior a slow process. To add to the difficulty, trout in different locations and different times of year behave differently enough that on more than one occasion I have been forced to question the meaning of life... or just my current tactic. I kid, but seriously, what else does one do when casting and retrieving in the solitude of the stars. And, just when I think I am starting to figure things out, some new idea or view comes to my attention. It's quite the process, but I love it.
Along this journey of piscatorial exploration fly patterns are like way-points. People who prefer to tie and fish their own patterns rarely stick with a particular pattern indefinitely. This may even be the case when a fly has proven effective. As new patterns emerge, those left behind serve as tangible glimpses into their designer's past. Many fail to see it, but both the tyer, and often their close friends recognize the memories held in one little fly. I see some of my own history through those little creations. It's a history of learning, and I often find myself wanting to tell people that "I used to tie it that way, but now I do it this way." When that urge arises, I often want to include accompanying explanations as to whys.
Well, here I am again, doing just that.
This post --> Mousing: The hookup problem is a precursor to this post, and pattern. It presents some of the problems faced when mousing at night, many of which I try to address with this pattern.
Fly Tying: The Ichabod Artimouse
Fortunately, the Ichabod Artimouse is a relatively simple pattern to tie. Unfortunately, that does not make it a fast fly to tie. The following is a list of what you will need to tie one up. Ingredients: Hooks
-Size 2/0, Gamakatsu Fine Wire Worm Hook
-Size 4, Gamakatsu B10S Stinger Hook
-Size 1/0 Matzuo Baitholder Offset Straight Eye Hook (you could use a wire shank here) Head
-Foam head (old/cheap flip flop, large double barrel popper head, foam shop mat, or layered foam)
-Tube fly tubing (clear pen tube with a pipe cleaner, or any other sturdy fly tube)
-2 or 3mm foam sheet
-UV Glue Body
-Yarn Bee Gilt Eyelash Yarn (I use black when using this material) OR -Rabbit Strip, like the original Artimouse (whichever color you prefer)
-Ice Dubbing (again, I use black for my night pattern, but you could definitely mix it up. A bright color may even somewhat resemble the classic Hemorrhoidal Mouse if put in the right area) Legs
-Medium Round Rubber Legs (I prefer medium because when furled, the knots usually hold. The larger doesn't without a speck of super glue) (whichever color you prefer) Tail
-Rabbit Strip (for this pattern, I used black, but you can mix it up)
The two following videos are both tutorials for the mouse pattern, but the first is a very succinct version, for those who just want that. The second is longer, and has much more commentary on the different parts. After the videos, I have included the reasons why I came up with the pattern in the first place.
When I first shared the Artimouse, it was fascinating to behold the changes that occurred in the world of mousing for trout. I've noted many people and patterns influenced, many of which I'm sure have no clue. That's just the nature of the internet. Now I see angled, large foam floating heads, and furled legs on mouse patterns all over. It's cool to see such a ripple effect and I definitely love seeing the resulting beautiful fish from people using the pattern. People all over have since added their tweaks and personalized parts, which has also been fun to witness. But, I digress, so, back to the main idea. If the original Artimouse works, why change anything? I'm so glad you asked. The following video addresses the topic.
This post is a precursor to my new artimouse pattern. It has been affectionately dubbed the "Ichabod Artimouse". Its creation was to try and deal with some of these issues. Now, let's get nerdy.
Hookups and mousing sometimes feel like antonyms. It's as if they are the same poles of two magnets that we try to force together. For anyone who has dedicated time to mousing at night, they can attest to the low hookup to blowup ratio. This is not based on any scientific studies, but my experience leads me to say that in general only about 20-30% of mouse-takes at night result in a hookup. This number varies some according to location, retrieval direction and type, timing and speed of the set, size of fish, and the fly being used. I have had magical nights where everything fell into place and my hookup to miss ratio was much greater, but as a rule, I hook far less fish than I hear or see splash at my fly. But, why?
It is an issue that has been swimming around in the cerebral juices of my mind for the past few years. It does not help that the questions only multiply with added contemplation. Is it just part of mousing, and as such, is an un-fixable problem that mousers must live with? How often are real mice missed in the wild? Is it all about retrieve and set style, or can fly design alter the outcome? Where to begin?
Problem #1 - Messy Takes
First and foremost, a mouse swimming in the water is a potential thanksgiving meal for an ambitious trout. The protein payoff is great, but the effort required to engulf and swallow such a large offering hardly matches the effort it takes to sip a small caddis. The angle of the take is a bit more vertical than a regular rise, as is evident by the toilet bowl flush/splash sound one hears in the darkness of night. It is usually violent. A fish that has committed to eating a poor amphibious mouse is out to kill, to drown, and often to eat. It's not pretty, and it's not clean cut. I think the fish that we hook are those who opt to eat their quarry whole and living, without the fear of being prey themselves. I guess we could call them raptor browns (think Jurassic Park raptors). With this carnal energy, combined with the angle of attack, it is not always easy for a trout to connect with the target. Items floating amid the waters surface tension act/react differently from items that are fully submerged. One moves out of the way easier than the other. It's worth thinking about. We can actually witness this whole messy take phenomenon in the following clip:
The fly is pushed out of the way, whereas if the same fly were subsurface it would be less likely to be pushed out of the way. I think this air-ball effect is often what is happening in the darkness of night, where both human and fish cannot see as well. We just aren't able to witness the fumbles visually. This brings up more questions. Does a smaller fly produce more hookups, or does a larger pattern?
Problem #2 - The Drowning Tail
This issue may well have been placed with the previous, but recent discovery of this video illustrated it so well that I thought I should give it separate attention. Often browns, especially those in slower waters, will try to drown the fly before consuming it. Often the tail is used as the tool. This also results in a very loud splashy noise, and if you are fishing in the dark of night, it's hard to tell the difference between a mouth-take and a tail-slap. So, naturally, we set on these tail-takes. We often feel the fish, but set only to find absolutely no resulting pressure. Because of this behavior, it can be very effective to cast the fly right back to where you felt the set, and let it linger there for a moment, occasionally adding very minute tremulous movements. The attacker may simply be hunting around in the darkness to find it's drowned victim. The following is a video that demonstrates this behavior exceptionally well.
Problem #3 - Big Fly, Little Fly
Flies, both big and little miss fish. Each has their strengths and weaknesses. To be honest, I'm still not decided on the matter. Small flies can certainly fit into a gaping brown trout kype with greater ease, and may leave hooks more exposed with the lesser amount of material used, but the target is harder to see (especially at night) and draws less attention in disturbed water. Smaller patterns can also be easier and less tiring to cast, but are also easier to push aside during an up-swelling take.
Larger patterns are easier to see in the dark, push more water, and can draw more attention. If they are articulated, their attraction factor increases with the extra jointed movement. This can add to the appeal and realism of the offering. In some circumstances I have done better with smaller patterns, but in my experience, this has only been evident when it is smaller fish doing the taking. Larger flies that hold more water are less easily pushed out of the way, but the fish has to hit it at the right angle, as there is more to fit into the mouth. They can also be more difficult to cast with the greater wind resistance. I always start out with an artimouse type fly simply because it is my confidence pattern, and has proven itself again and again.
Problem #4 - Hook Placement and Type
With a larger pattern, where it presents an option, it seems that fish either go straight for the head, or nip the butt, or sometimes the tail of the fly. If the fly is presented right, in relation to how a fish is oriented in the current, the fish T-bones the fly (the best scenario for hookup in my opinion). Because fish generally go for the head or butt of the fly, hook placement can be the difference between a fishless night or one spent tussling with trout. If the hook is too far back (at the end of the tail), you can snag the fish, if it is too far forward, it doesn't usually stick. I'm not opposed to placing a hook at the end of the tail, but I rarely choose to do so. This is not for lack of experiementing and trying. If it has worked for you, cool beans, keep it up. Another issue with stinger hook placement is distance between the two hooks. Place them too close together, and it can cut your hook penetration power in half (much like a bed of nails distributes and lessens the pressure of any individual nail). I have found great success with only using the stinger hook (I prefer mine just after the butt of the fly). I think clipping off the front hook can not only maintain the available pressure/force, but also allow more momentum to build before the hook makes contact, which can result in greater penetration. Gotta love physics.
One issue that a friend of mine brought to my attention, in regards to stinger hooks was the way they behaved due to their design. With a stinger hook, if it has a short shank, the hook can easily turn away from the thing you are trying to stick it into. The eye of the hook, being closer to the bend of the hook, allows more movement away from the intended target. Also, the angle of the eye sets the hook point further out of the way. For this reason, I now place some tubing on my regular octopus stingers to keep the hook exposed and in the line of duty. Or, I simply use a longer shank-ed, straight-eyed hook. Because these are difficult concepts to explain and visualize, I created the following video:
One more thing that can reduce hookups has to do with the size of the hook itself. People often tie mouse flies on larger diameter wire hooks. The finer the wire of hook, the easier the penetration. I think misses and lost fish can occasionally be attributed to this factor. I prefer my hooks super sharp and my wire fine.
Problem #5 - Fly Mass
No matter what kind, or how much material you put into a mouse fly, it will not match the mass of the real deal. A real flesh and blood mouse has a greater mass, and therefore, is not moved or pushed away from the trouts mouth as easily as an imitation. I suppose we could make a pattern that weighed as much, but no one would want to cast it. Maybe I would on a spinning rod, but on a fly rod the thought isn't at all appealing. This is one area it is difficult to address with a fly. I often wonder how much it affects the outcome. Larger flies or materials that retain water may be less susceptible to this problem.
Problem #6 - Big Fly Heads
Fish commonly go for the head of a fly. Sometimes having a large foam, cork, or deer hair head can prevent the hookup. The fish often get the fly in their mouths, tension is felt, the angler sets, and then the fly comes flying back at the angler, without the fish in tow. Here is what I think is happening. Once the tension is felt and the angler sets, the big head forces the fishes mouth open. The jaw pops open because there is so much force placed on the fly and the fish doesn't have time to clamp back down on the hooks, which follow right behind the fly's head. I think this is one reason some anglers prefer the smaller flies. A smaller pattern usually has a small enough profiled head so as to not impede the hookset. With the bigger patterns, I think this downfall can be, at least partly, overcome by proper timing on a set.
Another problem with large foam heads is the water resistance they have. It's like attaching a large thingamabobber an inch or so from your hook. There's bound to be issues with the hookup and fight. I see three obvious problems it presents.
Firstly, when a fish takes the fly, the angler has to set hard enough to force the hook into the fishes lip. The force necessary is magnified considering the angler is pulling a chunk of foam through the water as well. The big head's ability to push water makes the mouse pretty irresistible to fish, but it adds a degree of difficulty in setting the hook. Two edged sword I suppose.
Secondly, water resistance and a large foam head also, in some cases, I think, cause the hook to work out once the fish is hooked. When a fish is thrashing around under water, the head has buoyancy force pushing it upward, making it want to float, as well as the force pushing it in the back and forth water resistance. It's no wonder it can pop out during the fight.
Third, and lastly, some sensitivity is lost. When a fish comes up and takes the fly from anywhere but the head, the fish must pull against the floating head for the angler to even feel something. Not all mouse takes at night are loud and splashy, in fact, I think the bigger the fish the less splashy and noisy a take is. If a big fish "sips" in your fly by the butt end, you aren't likely to even notice, and by the time you move to set, the fish has already let go.
These are some of the primary issues I have tried to address with my most recent mouse pattern, the Ichabod Artimouse (Ichabod Arti for short). Its tying tutorial will be put up shortly after this post.
Problem #7 - Setting Struggles (Timing)
On multiple occasions, I have found myself mousing right alongside a friend. One is hooking fish and the other is struggling to connect. Both fishing the same fly. Both fishing the same water. Both getting takes. Only one connecting. The difference? At least in part, it is the timing of the set. I once heard that in New Zealand, guides encourage their clients to say "God save the queen" before setting on their dryfly takes. This is to allow the fish to turn away, causing the line and in turn the hook to press against the fishes lip, so as to increase the chance of connecting with the hook. I have tried applying the technique to my mousing, and it makes all the difference. I used to be a big proponent for only setting once you feel tension. I have since changed my opinion of the matter. I now treat my mousing takes like a big fish dry fly take. Listen to the take, wait a moment for the fish to turn, then strip set hard (I often also add a rod set to this action). On one trip this year with a friend, who was in the exact same scenario I mentioned a moment ago, he finally got the extra pause down, and proceeded to hook up and land fish the rest of the night.
I think sometimes anglers think a fly does not work because they are struggling to hook a fish. They sometimes switch to a different mouse pattern and start having more success. There is nothing wrong with this, but I think the change in fly is more successful because it better matches that individual's technique rather than the fly itself being any more or less effective. Cast, retrieve, and even setting are all affected by the patterns we choose to fish. Go with your confidence fly, but remember there is always more to learn with other patterns, which leads me to the last problem.
Problem #8 - Impatience
Sometimes all we want to do is catch fish. I often find myself gravitating toward the places I have already known success. But, I also know the gratification of fishless nights of discovery and learning. Sometimes I want one, and sometimes I crave the other. Success is always sweeter with the latter. It is earned, and I always come away wiser and with more ideas. People don't have to enjoy the same things, or approach them the same as myself. I'm grateful that most do not, despite my liberal giving of information. For those who are interested in having more success with mousing, to you I say, do not give up. Limit yourself to only fishing one mouse pattern for the whole night. Try it for a whole day even. And don't give up on a specific location. Try it from different angles, different water levels/time of year, and with different retrieves. I have fished the same waters that others have pounded to death, only to find success from approaching it differently. If you keep getting blowups, but aren't getting it to connect, try slowing your retrieve down, waiting longer after the take, or set even when you don't feel tension. Success will always be hidden from the impatient, both in mousing and in life.
Final Thoughts
No matter what an angler does or fishes differently, I still think there will be plenty of missed fish, especially when chucking a mouse at night. Much of the missing, I think, is the nature of the beast. We anglers miss plenty of fish even in broad daylight. But, just like during the day, we can make adjustments to our technique and our gear to increase our odds. Once an angler gets these things in line, I'd dare say the hookup rate improves to around 80%, and 80% is a pretty epic night of mousing.
A couple weeks ago I found myself perusing the local newspaper during a slow moment at work. While scanning for a captivating headline I happened upon an article titled "Vole-Vasion." It was in the farm and ranch section. Words like "plaque," "mild winter," and "epidemic" were used to describe the current rise in vole population. If you are a farmer, rancher, or like having a yard less holy than a priest, this is bad news. As I read through the article I couldn't help but think of the implications on the mousing expeditions yet to come throughout the rapidly approaching summer. The gist of the article was that voles (and I am assuming mice fit into the same category) were already a big problem going into our previous fall season and Idaho never really got the hard freeze it is so accustomed to. The harsh cold usually kills and slows rodent populations. The result was the already burgeoning vole population from the previous fall has exploded. The population supposedly grows and shrinks with a regularity like a pendulum swinging back and forth. It's a 10-12 year cycle and we happen to be on a peak. Bad news for the green thumbs and country folk who like their lawns less pitted but such good news for an angler wanting to chuck a fly that resembles a little furry mammal.
It was with these high hopes that we hit the road about 9:30 in the pm. It was a cloudless and dark night. Cruising down the empty highway we spied the intermittent critter scooting across the road. "Why did the mouse cross the road?" Who knows, but there were a ton of them! All the mice on the road bolstered my confidence in hitting the water. After parking we climbed out of the car to cool air and a star-filled sky. The milky way is so stunning on moonless nights, especially when you get away from civilization. We quickly rigged up and hit the water. First cast, SPLOOSH! The characteristic toilet-bowl-flush/water-exploding sound gets the adrenaline going! It was a swing and a miss, but it still instilled confidence. The night was spent with far more misses than hits, but there were so many explosions it was a hoot. The Artimouse worked stripped and dead drifted. These browns tore line from the reel like crazy. One even gave me a line burn. Mousing is so addicting!
I had taken a break from fishing and social media over the past month. It was a fitting trip to resume angling. The article had it right. It's like Mars Attacks, only with mice/voles. The implication? This summer could be epic.
Why make a new mouse pattern when there are some very effective and proven patterns already? Good question. Aside from my usual desire to tinker and urge to personalize my piscatorial pursuits, I began noticing a couple things as I studied in-water mouse behavior.
The Movement
Once a mouse falls or climbs into the water they do not stop swimming. The motion is pretty constant and yet it has a very erratic look. Here is a short video that shows the quick motion of the torso, which results in a "swimming tail" look. The tail wiggles back and forth as a result of the kicking legs.
The Legs
When mice swim, their hind legs serve as the motor. A mouse's hind legs are far more powerful than their front legs, and they rely heavily on them when in the water. The hind legs extend past the mouse's rear while swimming. One shoots out, then the other in rapid succession.
There are some excellent mouse patterns out there, a couple of which I think are prime for certain circumstances, but I'll get more into that in my night fishing/mousing tactics post later. Most patterns are either cut from rigid deer hair (no inherent movement), lack legs, are restricted to one hook, or lack the ability for the tail to "swim". As I did research, trying to make this the #yearofthemouse I came to realize with some tweaks I could develop a pattern that better fit my needs. Enter the ArtiMouse.
The ArtiMouse is so named because of the added articulation. I initially thought about calling it the Artimus (mus being Latin for mouse, and it made me think of Maximus from Gladiator), but thought the simpler title might be more accessible. It is a super simple tie with only a few ingredients. I think the key differences with the Arti-Mouse from the patterns considered to be staple mouse flies are the angle and buoyancy of the head, the added legs and way they are tied in, the little bit longer tail, and lastly the articulating torso.
How To Tie The ArtiMouse
UPDATE 8/23/14 : I have been working with a new stinger hook version and have decided that I like it much much more, though it is just a bit more involved to tie. I produced a second video to show the modification.
Head: Six 2mm foam sheets (or whatever the heck the thickness of that cheap craft foam is) layered and glued together with spray adhesive. Cut into 1"x3/4" pieces for individual heads. A round, pointed popper head of similar size would work as well, just as long as it was attached at a 30ish degree angle to the hook.
Body: Rabbit strip (whatever color you prefer and think matches your local field mice... brown, gray, white, tan, black, etc...)
Legs: Medium Round Rubber Legs - 4 strands furled together - (tan, pink, white, black, or brown)
Tail: Rabbit strip, or Chamois towel (gives much more movement, but can tangle around the hook a bit more). If you want it short, tie it short, but I prefer mine to be at least 4".
Optional Glow: A small glow in the dark corkie can be cut into halves and one half can be glued to the nose of the fly. I say the "nose" because of the angle the fly sits in the water. I suggest placing the fly in the water, attached to some line and pull the fly slowly so you see where it needs to rest. The idea is so the fish can't see it so well, but you can when retrieving it. If you place it on the top of the head it will disappear from your view when you retrieve it (learned that one the hard way). Glow in the dark flashabou can work as well.
The Head: I chose foam because of it's ease. No need for fly floatant and no drowning fly. Popper heads would have worked great I'm sure, but for the money and ease of access the craft foam sheets were a good choice. I have also heard of people using or buying cheap/old flip flops to make popper heads. (9/10/2017 Edit: For the past three years I have come to solely use cheap flip flops. They are cheap, require no gluing, and make the whole process much simpler.) Craft stores often have cheap pairs for 1$ each, something to consider. The reason for the angled attachment to the hook is that mice create a V-shaped wake from their pointy head sticking up out of the water. The angled foam head mimics this wake.
The Body: I prefer rabbit fur because of it's inherent motion. It requires very little movement to actually look like it is moving. Also, in water it flares out and creates a bulky profile. This is also an advantage when casting because it becomes narrow and slicked down when out of the water. The one drawback is that in very fast water it gets narrow also, but even then I have had success swinging the fly.
The Legs: Most patterns have legs in odd areas, or no legs at all. I placed the legs on the tail section, so they can "swim" with the torso and tail. They also add to the profile when dead drifting the pattern. In the initial tying video I mentioned that to furl them they are twisted in opposite directions. That was incorrect (oops, my bad, sorry). Both sets of two are twisted in the same direction. If you were having trouble trying to furl the legs, that may be why. (If you don't want to bother with furling, simply using a rubber band will work as well.)
The Tail: Rabbit strips with most of the hair trimmed off rarely wrap back on the fly itself and allow for a decent amount of movement. I tend to tie my tails a bit longer than most. I know that most mice have pretty short tails, but I feel the movement created by the added length adds to the fly's appeal. Strips of Chamois towel give a lot more movement, but can be more of a hassle because it can tangle back on the hook. (9/10/2017 Edit: I now tie my tails a bit shorter, usually about 3-4".)
Misc: When in the water mice swim like most animals, with their head out of the water for breathing and body mostly submerged. This is why I only wanted the head to float, to mimic that angled orientation in the water. It think it also gives a more realistic side-view of the fly.
I put together a short video to show how the Arti-Mouse looks in action in the water. It was a little tricky filming and casting at the same time, but I think it helps show at least a bit of the motion it has in the water. Wish I could say "fish included"... maybe next time.
The following are a couple pictures (borrowed for educational purposes) that help to see some of what I'm talking about.
So far this pattern has proven effective. It is the result of quite a bit of testing and a handful of prototypes. I may make some variations or changes eventually, but so far this has done the trick. Give it a try and let me know if you have any luck!
If you are interested in the pattern, but don't want to tie any up yourself, they can be purchased. Just send me an e-mail or a message on one of my other social media outlets for details. Thanks.
More details on how I fish it can be found in this post: "Mousing"